Neicytechno – DHCP Server (Dynamic Host Configuration Protocol) is a method of distributing client IP addresses, Default Gateway, Netmask, DNS servers, domains, win servers automatically to every client connected to the server. There are two methods of IP addressing that we usually use in managing servers, namely Dynamic (DHCP) and Static.
We often use Dynamic or DHCP because it is very easy to implement on servers that have many clients. The use of a DHCP server is very useful when we create a computer lab with 100 client devices or more. Imagine if we had to type in the IP address manually on each client’s computer, it would take a long time and more effort.
What is the Difference Between Static IP and Dynamic IP?
A static IP is an IP that is fixed or an IP address that does not change. This IP is set manually by the user according to the gateway specified by the server. Meanwhile, Dynamic IP/DHCP is an IP that is leased directly by the Server to the connected Client, so that the user does not need to manually set the IP address such as static IP, and the IP address always changes according to the one given by the Server.
To better understand the use of DHCP servers, we will practice making DHCP servers and using them for client computers. The tools and materials we need are not too many, we will use 1 Routerboard, 1/+ Computer, LAN/Wireless Cable, and Winbox Application.
How to Set DHCP Server on Mikrotik Router
We will use ether2 as the interface that will use the DHCP Server feature. Before we configure the DHCP-Server, make sure the ethernet port of the Mikrotik Router that we will use (Ether for example2) has an IP address of 192.168.2.1/24
Then if you have added an IP, we will immediately create a DHCP server using the Winbox application.
- Open WinBox and Login Using Username and Password admin
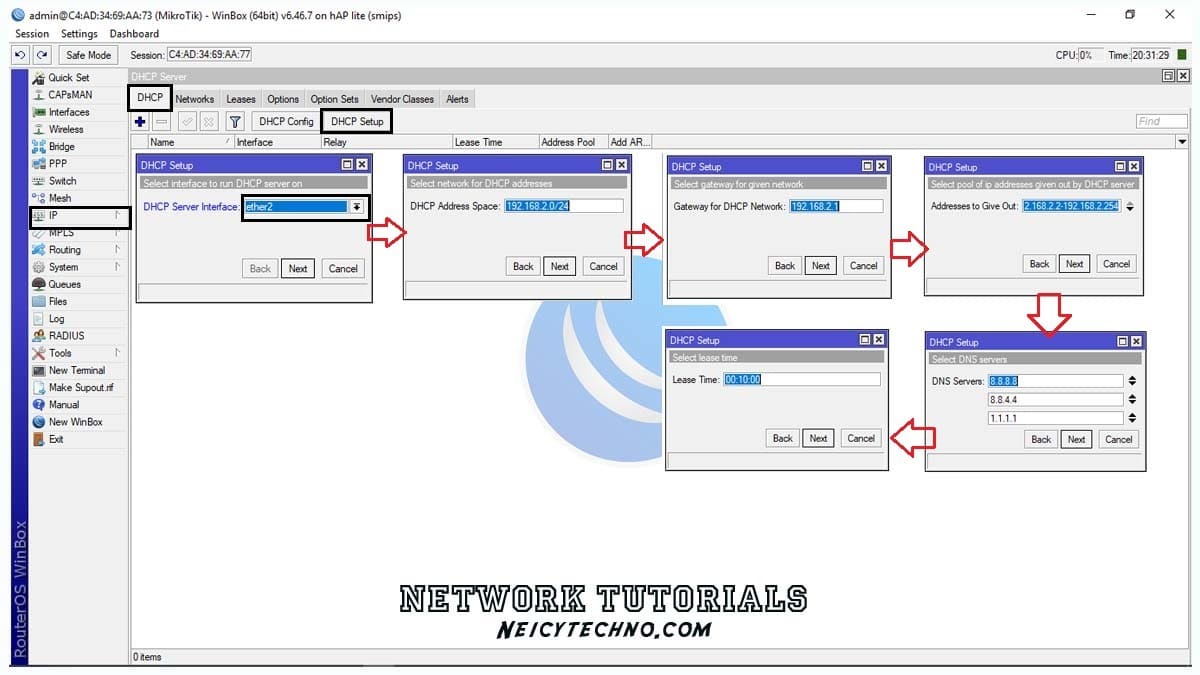
- Then enter the menu to the “IP—DHCP Server—DHCP—setup” menu and configure ether2 which will use the DHCP-Server.

- DHCP server interface = ether2
- DNS Server = 8.8.8.8 8.8.4.4 (DNS Google)
- Press Next Until Done
When finished, the DHCP server rule that we just created will appear like this. By adding a DHCP-Server, we no longer need to manually set the IP address for each client that will connect to the Mikrotik Routerboard Mikrotik, more precisely Ether2.

